
What Can You Do With Just $100?
With just $100, you can give your kitchen a major overhaul. You can maximize your storage space by utilizing high ceilings and corners, upcycle old kitchen items into functional pieces, and create a spice station that's both stylish and organized. You can also DIY drawer organization hacks, create affordable shelf dividers, and even transform a lazy Susan into a functional storage solution. Whether you want to declutter your countertops, build a custom cart, or simply refresh your kitchen's organization, $100 can go a long way. And with a little creativity, you can discover even more ways to optimize your kitchen's workflow and style.
Key Takeaways
• Refresh kitchen organization with a $100 budget by sorting and purging items, investing in decorative containers, and utilizing vertical space.
• Transform a lazy Susan into functional storage by adding decorative touches, creating compartments, and placing it near countertops.
• Create a spice station with $100 by curating a well-organized space, investing in matching spice bottles, and filling with essential spices.
• Upcycle old kitchen items with $100 by turning trash into treasure, transforming old gadgets into functional items, and giving old items new charm.
• Maximize storage space with $100 by installing shelves, using stackable bins, and freeing up valuable floor space.
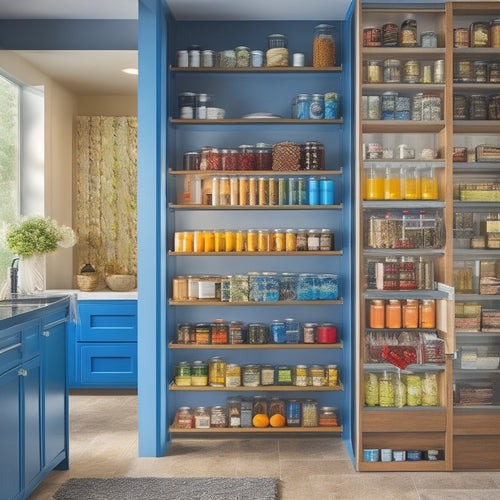
Maximizing Vertical Storage Space
With just $100, you can optimize your storage capacity by maximizing vertical storage space. Making the most of your ceiling height and freeing up valuable floor space is key. This is especially beneficial if you have high ceilings, as you can install shelves or storage units that go all the way up to the ceiling, providing ample storage without taking up too much floor space.
Consider investing in corner shelves, which are specifically designed to fit snugly into those often-wasted corners of your room. These shelves can hold everything from books to kitchen utensils, keeping them organized and out of the way.
You can also use stackable bins or baskets to store items like linens, cleaning supplies, or toys.
Upcycling Old Kitchen Items
With $100, you can breathe new life into old kitchen items that would otherwise end up in the trash. By upcycling, you'll not only reduce waste but also create unique pieces that add character to your kitchen.
You'll discover how to turn trash to treasure, revamp kitchen gadgets, and infuse old items with new charm, all on a budget of just $100.
Turn Trash to Treasure
Transforming old kitchen items into unique treasures can be a fun and creative way to reduce waste and get crafty on a budget. You can breathe new life into discarded items and turn them into functional pieces that tell a story.
Here are 4 easy upcycling projects to get you started:
-
Tea Towel Turned Apron: Upcycle an old tea towel into a cute apron with a few stitches and some ribbon.
-
Mason Jar Planters: Transform mason jars into adorable planters for your kitchen herbs or succulents.
-
Junk Journaling: Turn old cardboard, paper, and fabric scraps into unique journals that make great gifts or personal keepsakes.
- Fabric Scrap Coasters: Use fabric scraps to create colorful coasters that protect your furniture from water marks and add a touch of personality to your kitchen.
Kitchen Gadget Revamp
You can salvage your old kitchen gadgets and give them a new purpose by upcycling them into functional items that will continue to serve you well. This kitchen gadget revamp won't only reduce waste but also breathe new life into your kitchen.
With a little creativity, you can turn an old utensil holder into a planter for fresh herbs or transform a worn-out cutting board into a decorative serving tray.
By upcycling your old kitchen items, you'll achieve a gadget upgrade without breaking the bank. You'll also be giving your kitchen a invigorating makeover, perfect for a kitchen revamp.
Take an old mason jar, for instance, and convert it into a unique storage container for spices or oils.
Old to New Charm
Give old kitchen items a fresh spin by repurposing them into functional pieces that add a touch of charm to your kitchen. With just $100, you can breathe new life into vintage finds and give your kitchen a unique, rustic refurbish.
Here are some ideas to get you started:
-
Upcycle an old mason jar into a adorable utensil holder or vase for fresh herbs.
-
Transform an vintage window into a one-of-a-kind kitchen sign or menu board.
-
Repurpose an old wooden cutting board into a serving tray or wall-mounted pot rack.
- Give new life to a vintage tea infuser by turning it into a quirky planter or candle holder.
Creating a Spice Station
With just $100, you can curate a well-organized spice station that streamlines meal prep and elevates your cooking game. Start by deciding on a theme for your spice station. Do you prefer bold and spicy flavors or delicate and herby notes? Consider your favorite cuisines and the flavor profiles you want to showcase.
You can create a Spice Themes board with categories like Italian, Indian, or Mexican to help you stay organized. Next, invest in a set of matching spice bottles or jars that fit your theme. You can find affordable options at a home goods store or online. Fill them with your essential spices, such as salt, pepper, and oregano, and add a few signature spices to match your theme.
For example, if you're going for an Italian theme, add some dried basil and thyme.
DIY Drawer Organization Hacks
Cluttered drawers can suffocate your productivity, but a few clever DIY hacks can transform them into efficient storage spaces. With just $100, you can create a more organized and peaceful space that inspires creativity and focus.
Here are 4 DIY drawer organization hacks to get you started:
-
Drawer Liners: Add a non-slip liner to guarantee items from shifting and scratching the drawer. You can use adhesive-backed paper or fabric for a stylish touch.
-
Fancy Handles: Replace outdated handles with stylish knobs or pulls. This simple swap can elevate the entire look of your drawers.
-
Divide and Conquer: Use cardboard or foam dividers to separate items within the drawer. This keeps similar items together and prevents clutter from building up.
- Label It: Add labels to each section or divider to make sure you can quickly find what you need.
Affordable Shelf Dividers
You can create affordable shelf dividers using materials like cardboard, fabric, or even repurposed items, allowing you to maximize your shelf space without breaking the bank. This is especially useful when you need to separate items on a shelf, keep similar items together, or add some visual appeal to your storage space.
With a little creativity, you can turn ordinary materials into functional and stylish shelf dividers. For instance, you can use cardboard boxes or tubes to create simple yet effective dividers. You can also repurpose old bookends, picture frames, or even mason jars to add a decorative touch to your shelves.
If you're feeling crafty, you can sew or glue fabric to create colorful and patterned dividers that add a pop of color to your shelf styling. Plus, these dividers can double as decorative accents, adding a personal touch to your space.
Utilizing Back of Cabinet Space
Maximizing the back of cabinet space can be a game-changer for storing small items, keeping them out of sight while maintaining easy access. You can create hidden shelves or secret storage areas that are perfect for stashing away items like spices, oils, or cleaning supplies.
With just $100, you can purchase adhesive magnetic strips, over-the-door storage racks, or adjustable shelf dividers to optimize your cabinet space.
Here are some ideas to get you started:
-
Magnetic Spice Strips: Attach magnetic strips to the back of a cabinet door to store spices, oils, or frequently used condiments.
-
Over-the-Door Storage: Install an over-the-door storage rack to hang items like cleaning supplies, bags, or accessories.
-
Adjustable Shelf Dividers: Use adjustable shelf dividers to create separate compartments for storing small items like canned goods, snacks, or cookbooks.
- Hidden Shelves: Create hidden shelves by attaching a thin piece of wood or a shelf liner to the back of a cabinet, perfect for storing small kitchen gadgets or utensils.
Building a Custom Cart
With $100, you can build a custom cart that fits your specific needs, providing additional counter space and storage for your kitchen essentials. By designing a cart that suits your kitchen's unique layout, you can improve kitchen flow and make meal prep more efficient.
Consider the type of Cart Wheels you need, depending on the surface you'll be rolling on – soft wheels for hardwood floors or hard wheels for tile or concrete.
When planning your custom cart, think about the items you need to store and the height you need to accommodate. You can add shelves, baskets, or drawers to keep utensils, spices, and ingredients within easy reach. A built-in cutting board or utensil holder can also enhance the functionality of your cart.
With a custom cart, you can optimize your kitchen's workflow and create a more enjoyable cooking experience. By investing just $100, you can create a practical and personalized solution that streamlines your kitchen operations and helps you serve others with ease.
Decluttering Kitchen Countertops
Cluttered kitchen countertops can hinder meal prep, make cooking more stressful, and even affect the overall ambiance of your kitchen. With just $100, you can give your kitchen a refresh and tackle the countertop chaos.
Here are some ways to get started:
-
Sort and Purge: Remove everything from your countertops and sort items into categories. Be ruthless – if you haven't used it in the past year, consider donating or discarding it.
-
Invest in Containers: Use $20-30 to purchase decorative containers or baskets to store items like spices, oils, and snacks.
-
Utilize Vertical Space: Spend $20-30 on a wall-mounted shelf or hooks to hang items like pots, pans, and utensils.
- Add a Tray: Use $10-20 to purchase a decorative tray to corral small items like coffee creamers, sugars, and condiments.
Transforming a Lazy Susan
You can breathe new life into a lazy Susan by repurposing it as a functional and stylish storage solution in your kitchen. With just $100, you can give your lazy Susan a Lazy Revamp, turning it into a useful organizer for spices, oils, or condiments.
Start by cleaning and sanding the surface to remove any grease or grime. Then, add a fresh coat of paint or stain to match your kitchen's color scheme. You can also add decorative trim or labels to give it a personalized touch.
Next, attach small baskets, bins, or containers to the surface using adhesive or screws. This will create separate compartments for your kitchen essentials.
Finally, place your renewed lazy Susan in a convenient spot, such as near the stove or countertops. With your Susan Renewal, you'll have easy access to the items you need, keeping your kitchen clutter-free and organized.
This simple yet effective project is a great way to upcycle an old lazy Susan and create a functional piece that serves you and your kitchen well.
Frequently Asked Questions
Can I Use $100 to Renovate My Entire Kitchen?
You're facing a Design Dilemma: renovating your entire kitchen on a tight budget. While $100 won't cover a full overhaul, you can achieve a Budget Breakthrough by focusing on one area, like updating hardware or refinishing a single cabinet.
How Long Does It Take to Complete These DIY Projects?
When tackling DIY projects, you'll face time constraints, so create realistic project timelines to stay on track. Break tasks into manageable chunks, accounting for unexpected delays, to guarantee you complete your renovation efficiently and effectively.
Can I Customize These Projects to Fit My Kitchen Style?
"Just like a chef adds secret spices, you can tailor these DIY projects to your kitchen's unique flavor by incorporating personalized accents and embracing design flexibility, ensuring a space that's truly yours."
Do I Need Any Special Tools or Skills for These Projects?
You'll need some basic DIY tools and a bit of handy experience to tackle these projects, but don't worry, they're designed to give you creative freedom, so you can adapt and learn as you go.
Can I Use $100 to Buy New Kitchen Appliances Instead?
"Did you know 68% of Americans cook at home daily? You're considering using $100 to buy new kitchen appliances, but with budget constraints, prioritize which ones to replace first, like a faulty toaster or worn-out blender, to maximize your limited funds."
Related Posts
-
Sliding Pantry Organizers With Tiered Racks
Sliding pantry organizers with tiered racks optimize your pantry space and enhance accessibility. These organizers cr...
-
Tiered Dish Rack Organizers for Compact Spaces
Tiered dish rack organizers are perfect for compact spaces, maximizing vertical storage while saving precious counter...
-
Wall-Mounted Racks for Kitchen Tool Storage
Wall-mounted racks are perfect for maximizing storage in your kitchen. By utilizing vertical space, you can free up u...


