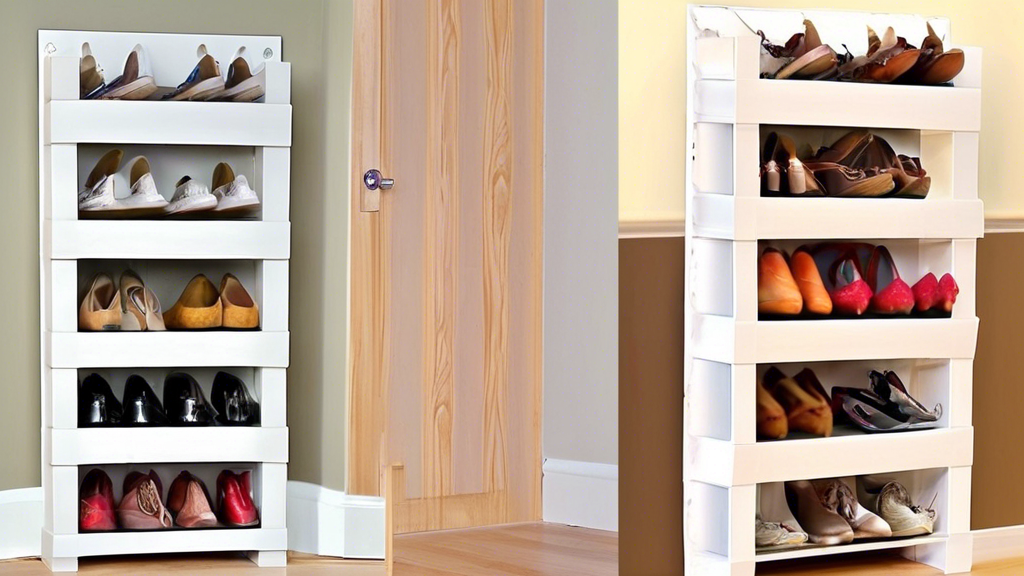
DIY Vertical Shoe Rack: A Simple Guide
Organize Your Shoe Collection with a DIY Vertical Shoe Rack
Hey there, shoe lovers! Are you tired of tripping over your beloved footwear that always seems to be scattered around your home? Trust me, I've been there too. But fear not, because I'm here to introduce you to a game-changer – the DIY vertical shoe rack! No more cluttered floors or mismatched pairs hiding in the corners. Let's dive into how you can easily create your very own vertical shoe rack and bring some order to the chaos!
Why Choose a Vertical Shoe Rack?
Before we jump into the nitty-gritty of creating your DIY shoe rack, let's quickly chat about why a vertical shoe rack can be a game-changer:
- Space-Saving: Perfect for small apartments or tight spaces.
- Visibility: Easily see and access all your shoes at a glance.
- Organization: Say goodbye to clutter and hello to a tidy shoe collection.
Materials You'll Need
Now, let's talk about what you'll need to get started. Don't worry; these materials are easy to find and won't break the bank:
- Wooden planks
- Sandpaper
- Wood glue
- Nails or screws
- Paint or wood stain (if you want to get creative!)
Building Your Vertical Shoe Rack
Alright, it's time to roll up your sleeves and get crafty! Follow these simple steps to create your DIY vertical shoe rack:
- Measure and Cut: Determine the height and width you want for your shoe rack. Cut the wooden planks to your desired size.
- Sand and Smooth: Use sandpaper to smooth out any rough edges on the wooden planks.
- Assemble the Shelves: Using wood glue and nails or screws, assemble the planks into a ladder-like structure, ensuring they are securely attached.
- Paint or Stain: Get creative and paint or stain your shoe rack to match your decor or add a pop of color!
- Let It Dry: Allow your finished vertical shoe rack to dry completely before placing your beloved shoes on display.
Benefits of Your DIY Vertical Shoe Rack
Now that you've built your very own vertical shoe rack, let's talk about the perks you'll enjoy:
- Customization: You can personalize the design to fit your space and style.
- Sense of Accomplishment: Nothing beats the satisfaction of creating something functional with your own hands.
- Clutter-Free Space: Say hello to a well-organized home where you can find your shoes with ease.
So, what are you waiting for? Say goodbye to shoe clutter and hello to a stylish and organized shoe collection with your DIY vertical shoe rack. Trust me; your future self will thank you for taking the time to create a practical storage solution that not only saves space but also adds a touch of personality to your home!
Related Posts
-
Space-Saving Kitchen Island Storage Hacks
You can change your small kitchen into a functional haven with clever space-saving island storage hacks. Start by ins...
-

Dish Drainer Options for Kitchen Islands
When selecting dish drainers for your kitchen island, consider options that maximize space and enhance workflow. Comp...
-

Creative Corner Cabinet Space Management
Creative corner cabinet space management turns neglected nooks into stunning storage solutions. You can maximize vert...


