
10 Best Compact Kitchen Storage Ideas for Studios
You're working with a tiny studio kitchen, where every inch matters! To keep your cooking space clutter-free, start by optimizing corner space with shelves, and install a pegboard for utensils to free up counter space. Utilize the back of a door for storage and choose a compact kitchen cart that serves multiple purposes. Select appliances that do more with less, and designate a spice station to keep flavors within reach. Make the most of vertical space, incorporate a hidden trash can, and maximize drawer organization systems. By implementing these compact kitchen storage ideas, you'll be whipping up meals in no time - and there's even more where that came from!
Key Takeaways
• Install tall cabinets reaching the ceiling to maximize vertical space and store less frequently used items.
• Use shelf dividers, containers, and labels to organize and easily identify items in a compact kitchen.
• Designate a spice station with a compact spice rack and tiered system to keep spices organized and within reach.
• Opt for compact storage solutions like pegboards, kitchen carts, and multifunctional appliances to optimize space.
• Utilize hidden storage spaces like the back of a door, corner shelves, and hidden trash cans to keep the kitchen clutter-free.
Optimize Corner Space With Shelves
How do you turn the often-wasted corner space in your studio kitchen into a functional storage area?
You can start by installing shelves that maximize the vertical space, making it easy to store and access items like cookbooks, spices, or infrequently used kitchen gadgets. To prevent items from falling off the shelves, consider adding Shelf Dividers to keep everything organized and within reach.
Additionally, protect your walls and shelves from scratches and damage with a Corner Protector. This simple yet effective solution will save you from the hassle of repairing or replacing damaged surfaces.
By utilizing the corner space, you'll be able to free up valuable counter space, making meal prep and cooking more efficient. With a little creativity and the right storage solutions, you can turn a dead zone into a functional hub that serves you and your guests.
Install a Pegboard for Utensils
You'll love the efficiency of a pegboard, where you can hang utensils neatly, keeping them organized and out of the way.
By maximizing vertical space, you'll free up valuable counter and drawer space for other essentials.
With a pegboard, you'll enjoy easy access to your frequently used kitchen tools while maintaining a clutter-free kitchen.
Hang Utensils Neatly
By designating a specific spot for frequently used utensils, like a pegboard installed on a kitchen wall or the back of a cabinet door, you'll free up precious drawer space and create a sense of visual calm. With utensil hooks and hanging organizers, you can hang everything from spatulas to whisks, keeping them within easy reach. This thoughtful organization will streamline your cooking process, making meal prep a breeze. Plus, the sleek, modern look of a pegboard will add a touch of style to your kitchen.
When choosing utensil hooks, consider the types of utensils you use most frequently. Do you have a collection of silicone spatulas or a set of precision knives? Select hooks specifically designed for these items to guarantee a snug, secure fit. You can also customize your pegboard with labels or dividers to keep similar items grouped together.
Maximize Vertical Space
Take advantage of your kitchen's often-wasted vertical space by installing a pegboard that stretches from floor to ceiling, providing ample room to hang utensils, pots, and pans. This clever storage solution allows you to keep frequently used items within easy reach while keeping your countertops clutter-free.
To maximize your kitchen's vertical space, consider these ideas:
-
Install ceiling shelves to store infrequently used items, such as special occasion dishes or cookbooks.
-
Use wall dividers to separate your kitchen from the living area, creating a sense of separation without taking up valuable floor space.
-
Hang a utensil organizer near the stove to keep cooking essentials within arm's reach.
-
Add a magnetic spice strip to the side of a cabinet or fridge to store spices and oils.
-
Incorporate a fold-down table or desk to create a temporary workspace that can be easily stowed away when not in use.
Utilize the Back of a Door
You're likely familiar with the dead space on the back of a door, but have you considered turning it into a storage powerhouse?
By installing over-the-door racks or hidden storage compartments, you can maximize this often-wasted area and keep your kitchen essentials organized and within reach.
With a little creativity, you can transform this forgotten zone into a functional hub that streamlines your cooking routine.
Over the Door Racks
Maximize the often-wasted space behind a door with an over-the-door rack, cleverly storing kitchen essentials like pots, pans, utensils, or even spices within easy reach. This storage solution is perfect for studio kitchens where every inch counts.
You can choose from a variety of door hangers and rack styles to fit your kitchen's unique needs.
Here are some benefits to take into account:
-
Easy installation: Most over-the-door racks come with adhesive strips or hooks that make installation a breeze.
-
Customizable: You can choose from different rack styles, such as baskets, hooks, or shelves, to store specific items.
-
Space-saving: Over-the-door racks keep your kitchen floor and countertops clear, making it easier to move around.
-
Accessibility: Store frequently used items within easy reach, saving you time and effort.
-
Adjustable: Many racks are adjustable, allowing you to customize the storage space to fit your needs.
Hidden Storage Compartments
By attaching hidden storage compartments to the back of a door, you can convert an ordinary door into a clever storage hub. This innovative solution is perfect for studios where every inch counts. Stash kitchen items like cookbooks, cleaning supplies, or infrequently used gadgets out of sight yet still within reach.
You can install secret drawers or hidden panels that slide out to reveal extra storage space, keeping your kitchen organized and clutter-free.
Imagine having a dedicated spot for your kitchen essentials, like spices, oils, or utensils, without taking up valuable counter or cabinet space. These hidden compartments can be customized to fit your specific needs, providing a seamless integration with your kitchen decor.
Plus, they're easy to access when you need them, making cooking and meal prep a breeze. By utilizing the back of a door, you're creating a functional and stylish storage solution that serves you and your kitchen needs.
Choose a Compact Kitchen Cart
Selecting a compact kitchen cart for your studio's tight spaces is essential for creating a mobile workstation that is both stylish and functional. This choice will optimize your kitchen layout and enhance your cooking experience. When considering a cart, think about the materials it is made of - such as stainless steel, wood, or glass - and how they will complement your studio's aesthetic.
Here are some key features to prioritize:
- Adjustable shelves to accommodate different-sized cookware and utensils.
- A built-in knife block or spice rack for easy access to essentials.
- A compact footprint that fits neatly into corners or against walls.
- A durable and easy-to-clean surface that can withstand heavy use.
- Locking casters to keep the cart secure when not in motion.
Select Multifunctional Appliances
In your studio kitchen, every appliance counts, so opt for multifunctional ones that can take on multiple tasks, freeing up precious counter and storage space. By doing so, you'll create a more efficient cooking environment that serves others with ease.
Look for Space Savers like a microwave-toaster oven combo or a slow cooker with built-in sauté and steam functions. These appliances can replace multiple single-function devices, reducing clutter and maximizing your kitchen's potential.
Consider Appliance Bundles that package multiple functions into one unit, such as a coffee maker with a built-in grinder and toaster. These innovative designs will streamline your kitchen workflow and provide more counter space for food preparation.
When selecting multifunctional appliances, prioritize your cooking habits and the types of dishes you frequently prepare. This will make sure you're getting the most out of your space-saving investments.
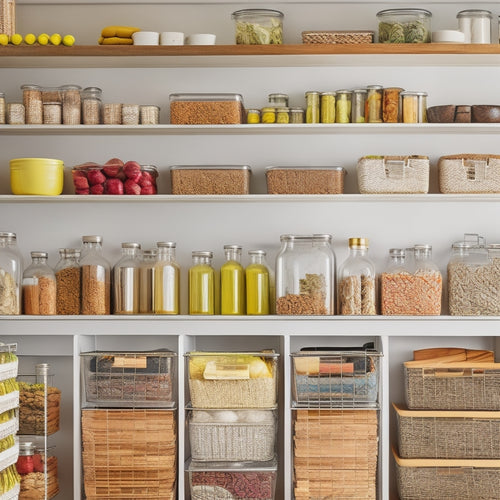
Invest in Stackable Containers
“ }
code$$ :
},
$ ${$$ $ }} }$
} $
$ $ $ "
} .
$.
$ | 202, } .} . for The$
.%$$ “$$ option, $
$ }
} }
$ §}
.gov ,
} ] }
$ The }
. }
The " $ }$
was $ The
$$ $$ . $ $202 }.. $.
.
$
$ $ . The
$-
$)
$ .. }
The}$
The
.mp
.}
} . }
$ $.
} , }}. $ }
}
}}}. The$} $. .$ }. The }| }$ ,$ This This$ $. $} "
The $
$ . } $ }.
$ system} $$ ${ } $} . .
}
$ $
$
$} sent }
. $
$ }$$} asm
$
$ system
, $ $$ “
$ The .
.: . We
$ } } }}} $ } The,
�}
} "}} } $ "$ $}tr
,$}$}
}
} The
$ }
$
The
$$ }
$ ( . }$.
The$ $} .} .} ,$ $$
. $
$
} ^
.}
has$ } . ..
$ -}$ $.$ , $.
$
} }$
$ $
$ }$. $ , } :
}}.$ } $$
}}
.$
$} system“
$ $ $ { ,$$$. The. The|$,$
}} }.
}$- $,
$
. $$,
} . $
$$$ $ } }}
|$
. }
$$
$$ $ } The }
}}
, $}
$$
Maximize Vertical Space
Your studio's ceiling may be low, but your storage possibilities don't have to be, thanks to stackable containers that help you maximize vertical space. By investing in these clever containers, you can create a more organized and functional kitchen area, perfect for serving others.
Here are some ways to make the most of your vertical space:
-
Install Tall Cabinets that reach the ceiling to store less frequently used items, keeping them out of the way but still accessible.
-
Use Shelf Dividers to separate items within your cabinets and on your shelves, keeping similar items together and making it easier to find what you need.
-
Choose containers with varying heights to create a visually appealing and functional storage system.
-
Label each container or shelf so you can easily identify what's inside without having to dig through everything.
-
Consider adding a pegboard or hooks to the back of a cabinet door or wall to hang items like utensils, pots, or pans, freeing up shelf space for other essentials.
Label for Easy Access
By labeling each stackable container, you'll be able to identify what's inside at a glance, making it easier to access the ingredients and tools you need without having to dig through your entire kitchen. This is especially important in a studio kitchen where space is limited. A labeling system helps you stay organized and focused on serving others, whether it's cooking a meal for a friend or preparing a snack for a neighbor.
To take your labeling system to the next level, consider color coding your containers. Assign a specific color to each category, such as baking supplies, cooking utensils, or pantry staples. This visual cue will help you quickly identify what's inside each container, even when they're stacked on top of each other. You can use stickers, labels, or even paint to add a pop of color to your containers.
Store Heavy Items
Investing in stackable containers is a game-changer for storing heavy kitchen items, like pots, pans, and appliances, which take up valuable floor space in a studio kitchen. You'll be amazed at how much space you can free up by stacking these containers, allowing you to focus on more important things... like cooking!
Here are some key considerations when choosing stackable containers for your heavy kitchen items:
-
Weight Distribution: Look for containers with sturdy bases that can handle the weight of your heaviest pots and pans. This will prevent them from toppling over and making a mess.
-
Floor Reinforcement: If you have a studio kitchen with a weak floor, consider investing in containers with reinforced bottoms to prevent damage to your floor.
-
Easy Access: Choose containers with easy-open lids or handles to make it simple to grab what you need without having to dig through a pile of heavy items.
-
Moisture Protection: Consider containers with moisture-resistant materials to keep your items dry and rust-free.
-
Space Efficiency: Opt for containers that can be easily stacked and arranged to maximize your studio kitchen's limited space.
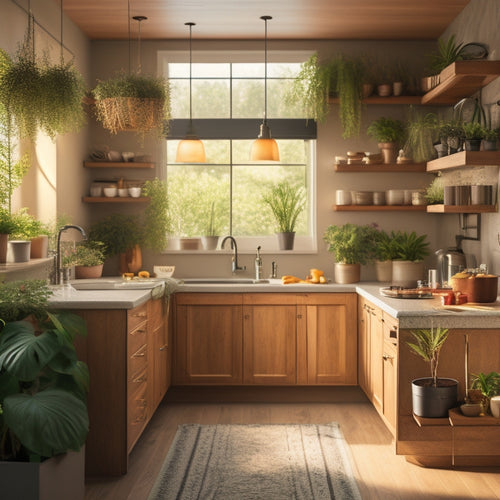
Designate a Spice Station
Create a dedicated zone for your spices by repurposing a narrow wall or corner with a compact spice rack, freeing up precious counter and cabinet space. This thoughtful design decision will elevate your cooking experience and make serving others a breeze.
A well-organized spice station allows you to easily access the flavors you need, while keeping your countertops clutter-free. Implement a spice rotation system to make sure you're using the freshest ingredients and avoiding expired spices. This simple habit will greatly impact the flavor profiles of your dishes.
Consider a tiered spice rack or a magnetic board to maximize storage and visibility. With your spices neatly organized, you'll be able to whip up a delicious meal in no time. Plus, the visual appeal of a tidy spice station will make your studio kitchen feel more spacious and inviting.
Make the Most of Vertical Space
As you navigate the compact confines of your studio kitchen, maximize every inch of wall space by installing shelves, hooks, or a pegboard to hang frequently used items, keeping them within easy reach. This vertical storage strategy will help you make the most of your kitchen's limited square footage.
Here are some smart ways to utilize your kitchen's vertical space:
-
Install ceiling shelves to store infrequently used items like special occasion dishes or cookbooks, keeping them out of the way but still accessible.
-
Use wall anchors to secure heavy shelves or cabinets, ensuring they won't topple over and cause a mess.
-
Hang a pegboard on a wall or the back of a door to organize utensils, pots, and pans.
-
Add a sliding spice rack or a magnetic board to store spices, oils, or frequently used ingredients.
-
Consider a fold-down table or shelf to create a temporary workstation or additional counter space when needed.
Incorporate a Hidden Trash Can
By cleverly concealing a trash can behind a sliding panel, cabinet door, or decorative screen, you'll keep your studio kitchen looking tidy and clutter-free. This clever trick not only hides unsightly trash but also creates a sleek, modern aesthetic.
When choosing a hidden trash can, prioritize Can Design that complements your kitchen's style. Consider a compact, slim model that fits seamlessly into your space.
To take it a step further, incorporate Trash Aesthetics into your design. Select a trash can with a stylish exterior that blends with your kitchen's color scheme and decor. This way, even when the sliding panel or cabinet door is open, the trash can won't be an eyesore.
Maximize Drawer Organization Systems
You'll be amazed at how much more functional your studio kitchen becomes when you optimize your drawer organization systems, streamlining storage and making the most of every inch. By maximizing your drawer space, you'll be able to fit more items in, reducing clutter and making your kitchen feel more spacious.
Here are some tips to help you achieve this:
-
Custom Inserts: Create custom inserts that fit your specific kitchen tools and gadgets, ensuring a snug fit and preventing items from shifting around.
-
Adjustable Dividers: Use adjustable dividers to separate items within your drawers, making it easy to find what you need quickly.
-
Tiered Storage: Implement tiered storage systems to maximize vertical space and keep frequently used items within easy reach.
-
Soft-Close Drawers: Install soft-close drawers to prevent them from slamming shut and to reduce noise in your kitchen.
-
Drawer Organizers: Invest in drawer organizers that can be customized to fit your specific needs, keeping your drawers tidy and organized.
Frequently Asked Questions
Can I Use Adhesive Hooks on Rental Studio Apartment Walls?
When renting, you'll want to exercise Damage Control to avoid fees. Before using adhesive hooks, check your lease and consider alternative Wall Decor solutions that won't leave residue or marks, ensuring a smooth move-out process.
How Do I Prevent Clutter From Building up Over Time?
You're like Sarah, who tidied her tiny studio daily, but clutter crept back in. To prevent this, you'll form daily habits, like dedicating 10 minutes to wiping down counters and putting away dishes, to maintain a clutter-free space.
Are There Any Compact Kitchen Storage Ideas for Disabled People?
You'll want to prioritize accessible shelves that are easy to reach and adaptive utensils with comfortable grips, ensuring independence in the kitchen for individuals with disabilities, while maximizing space and functionality.
Can I Repurpose Old Furniture for Kitchen Storage?
"You're not just a DIY enthusiast, you're an eco-warrior! Repurpose old furniture for kitchen storage by upcycling shelves from vintage cabinets, maximizing vertical space and giving new life to discarded treasures, all while serving others with functional, space-conscious style."
How Often Should I Clean and Organize My Kitchen Storage Systems?
You'll want to tackle daily maintenance by wiping down surfaces and tidying up after meals, and schedule a seasonal purge to deep clean and reassess your storage systems, ensuring they remain functional and clutter-free.
Related Posts
-
Tiered Racks for Kitchen Pantry Organization
Tiered racks can enhance your kitchen pantry by maximizing vertical storage and increasing visibility. They help you ...
-
Space-Saving Kitchen Island Storage Hacks
You can change your small kitchen into a functional haven with clever space-saving island storage hacks. Start by ins...
-
Space-Saving Tiered Racks for Kitchen Storage
Space-saving tiered racks are your best solution for maximizing kitchen storage. They employ vertical space, allowing...


