
 |
|
As I promised for JUNE, (yet here it is JULY) I'm posting the photos of the side patio garden of VILLA LEONE |
 |
|
Most of these photos were taken in the summer 2019 but some of them I snapped in the spring of the same year, while the garden was still in transition. As usual with me, I ended up changing things too many times to count, and taking tons of photos of every new alteration, which made sorting through all of them a labour intensive job. Using the new Blogger format has been a wee bit challenging for me, and I actually had to go back to the old format, to install the photos then switch to the new format to write the text. EI YAAAH!!! even so- THE GARDEN |
 |
|
Beginning with the exterior house wall: I placed Jodi's gift of a little bird house, high on the wall and perched a chickadee on the roof, who's cautiously checking out the family cat sunning himself on the stone bench below! https://my-miniaturemadness.blogspot.com/ The birdhouse is next to the side door leading into the cool service entry of this ancient Venetian Villa. The arched kitchen window is covered by iron grill a laser cut gate kit purchased from Alpha Stamps. Between the window and the door are a pair of mens clogs (French feves) and a garden bench where the well fed cat lies resting next to a small pot of burgundy hydrangeas another lovely gift from Jodi. |
 |
| There are a set of narrow tiled steps which lead up from the canal at the side of the house, and into a small walled patio area. |
 | ||||||||
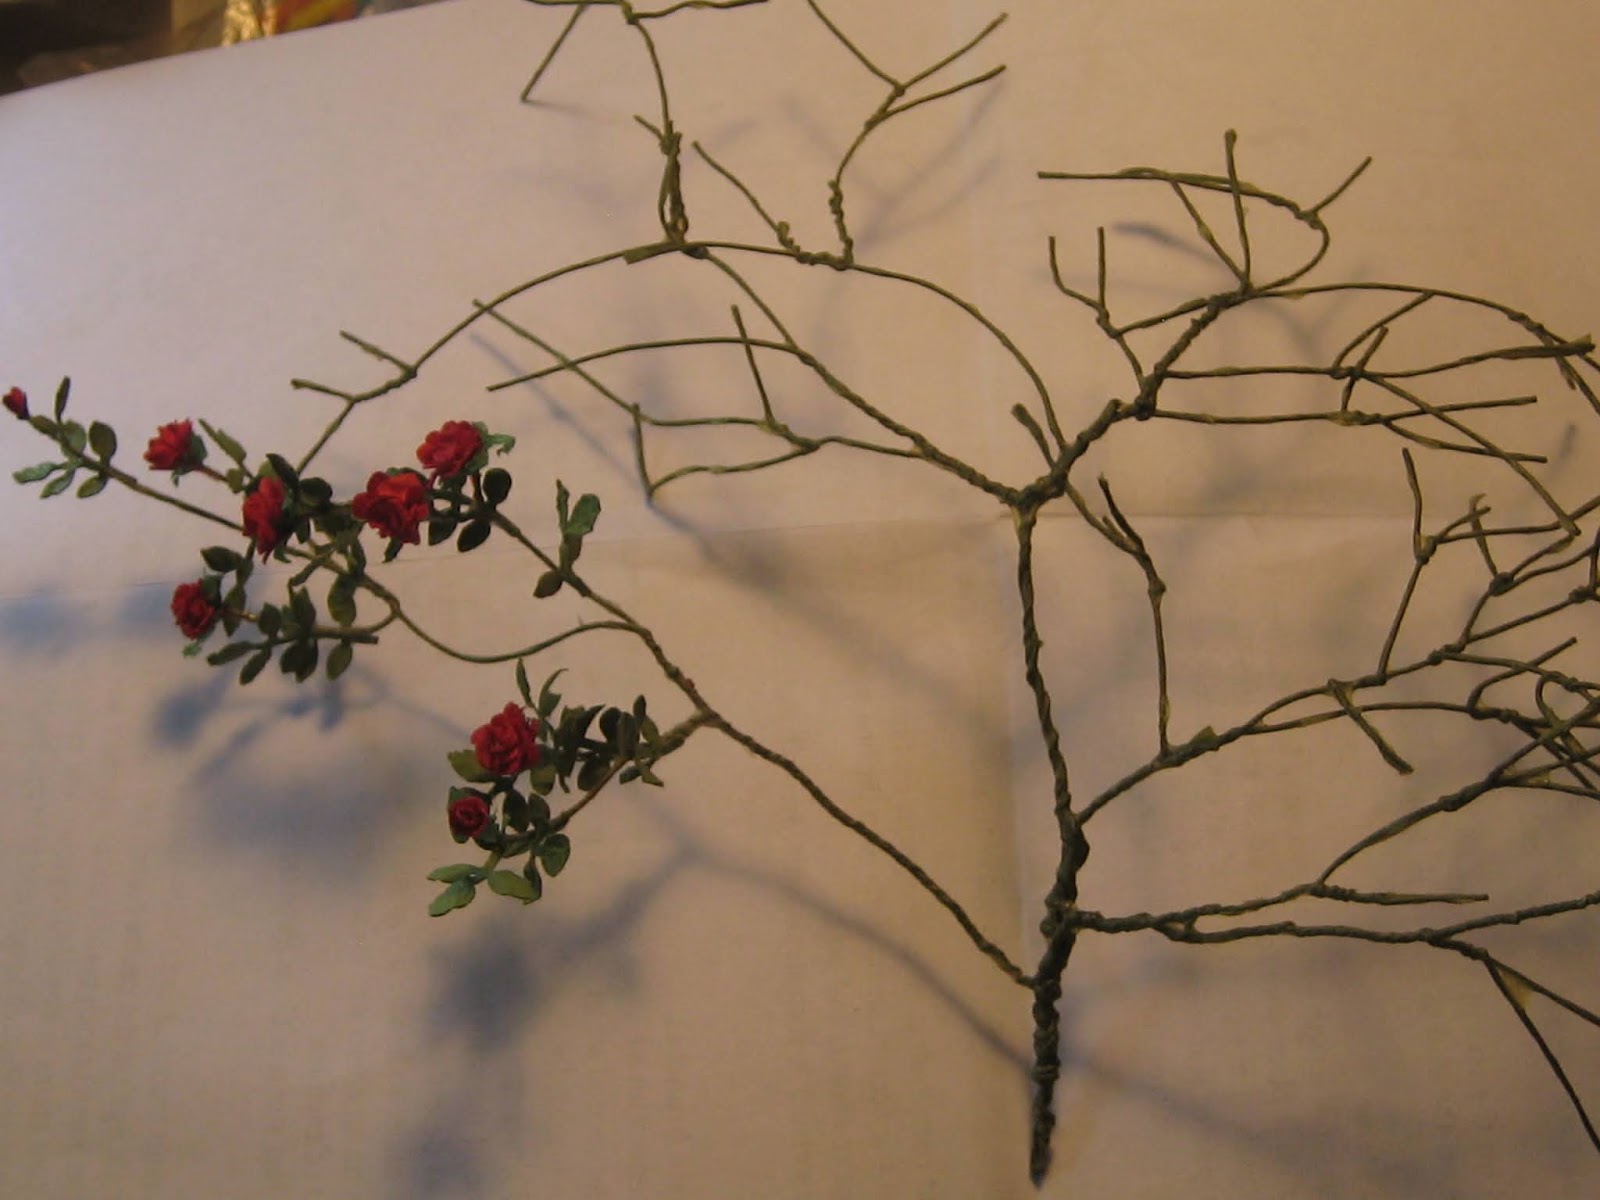
| Cat by Sarah Hendry One of the main features in my garden is THE CLIMBING ROSE Initially I made it to drape over the patio wall but later I moved it to clamber over the kitchen window.
|


 |
| here's what I did.... |
 |
 The petals shown above are from the blue hydrangea kits. Rather than paint them, I gave them an "eye" using a watercolor pencil then I lightly scribbled over the paper with a chartreuse wax crayon, and then a cerulean blue wax crayon onto both sides of the sheet. |
 | ||
 I used a ball tool to cup them and the friction of the metal against the wax softened the wax as it cupped the paper and blended the colours together.  I was able to vary the intensity of the petals by scribbling more or less colour onto the paper sheets.
  With another Bonnie Lavish Hydrangea kit, I used both crayons and inks which produced deeper petal colours. I still have a few more BONNIE LAVISH kits in my stash, so eventually I 'll be making more of these hydrangeas for the seaside garden @ LAND'S END. Meanwhile, I've purchased a number of appropriate paper punches to enable me to produce some of my own hydrangea shrubs very similar in style to these kits, so LOTS OF FUN still to come! Constructing the hydrangeas for VILLA LEONE were mini plant projects which I totally enjoyed! TREES There are 3 trees planted in this Italian garden: 2 of them are Cypress trees; one planted outside the kitchen window and the other inside the long planter. I THINK I found them in the home decor aisle at WINNERS ( aka T.J. MAXX) I removed their original bases and sprayed the foliage with Elmer's adhesive and then doused them with a variety of superfine railroad scatter material. The smaller tree which you'll see a little further down, is a full-sized plastic house plant which I remove from its pot, bound the stems together at its base and then planted the trunks as a deciduous tree in the opposite corner of the planter garden. sidenote: To this very day, I am still moving the trees in and out of the planter because I'm still not entirely satisfied with it- ah me..... |

 |
|
The plants growing between the tiles are MY versions of a creeping campanula.   |

| ||
|
Jodi's gift of Stargazer lilies are in this photo but I later moved them up onto the front balcony of the Villa so their fragrance could permeate the bedroom! THE GREEN STUFF GROWING ON THE VILLA WALLS I have a reference book entitled Venetian Gardens which feature many private gardens cloaked with green vines clinging to ancient walls. I wanted that look for the Villa so I tried out a few different methods to try and achieve it. At first, I used lengths of glue saturated twine for the framework of the vines, it was okay but very difficult to control. But what worked the BEST for me, was COIR coconut fiber liners intended for potted plants. I found mine in the garden section of a $1.00 store. I pulled the fibers apart and glued them to the exterior wall using Fabri-Tac adhesive. The base for the foliage was a green rayon hat from the thrift store which I cut into long sections to grow up the wall towards the 2 bedroom balconies. I sprayed the rayon material with Elmer's spray adhesive and then coated them with coarse railroad model scatter materials to bulk them out. Then I glued the greenery directly onto the walls with Fabri Tac and threaded more Coir "branches" throughout the foliage, followed by an additional light spray of STIFFY fabric stiffener to keep all the loose scatter in place.   I made a crude awning for over the side door and allowed the vines to crawl over it too! I'm pretty happy with the final look of both the vines and the green stuff! THE LOW PATIO WALLS I made a low concrete wall which encompases my patio garden on 3 sides using pink insulation foam as its base and layers of carved wood trims from HOME DEPOT for the carved stone. I coated both the wood trims and the pink foam with a base paint and then several layers of drywall plaster.  The photo below shows the inside of the garden wall and part of the wall return, still in the garden's early stages.
|


 |
| The chair seats I made and covered in a hot pink silk tie lining. I set the table with Limoncello and a dish of fresh figs, a book and fresh lemons. |
 |
| The figs are plastic buds from a fake flower which I re-painted then glued onto a rustic flat ceramic button |
 |
 |
| The limoncello came from Michaels craft store, and the plate of lemons from Victoria Miniland. |
 |
|
THE GARDEN PLANTER Because this entire garden was constructed for eating outdoors, my original intention was to fill the planter with a herb garden. But as the garden continued to develop, I scrapped that idea and went for more colour. I had lots of flower kits in my stash along with a few ready made plants which needed a home, so I fussed around with it until I came up with a scheme which was colourful and easy for the homeowners to maintain. A small burgundy Hydrangea was planted in the corner to compliment the one Jodi sent me, and next to the hydrangea is the small deciduous tree, I mentioned earlier. |
 | |||
|
In front of the tree and under the iris are pansies, which I was constructing for the first time and they turned out meh. They too were from a kit but I'd used too much colour on the paper and the details got lost. The group of iris were also first time tries and turned out better but not great; more practice is definitely required. FYI I've tried making more pansies after I'd made these using DRORA'S TERRIFIC PANSY TUTORIAL as a guide https://drorasminimundo.blogspot.com/2017/03/pansies-tutorial.html and after many flowers, I think I'm improving! But these first efforts work fine as underplanting infill.
|

 |
| The bronze statuette in the garden was removed from a second hand candy dish I'd bought at the thrift store. and below is the foliage of the plastic deciduous tree |
 | ||
|
|

 |
| Here's the greenery I purchased from ALPHA STAMPS straight out of the package. I LOVE its variegated greens but as soon as you begin to pull it apart some of the scatter will come off so I made sure to use a sheet of paper under it to catch the fallout for reuse later. The photo above shows the mat before it's been teased out and to the right is the same product after it has been stretched out and glued to the wall. |
 |
| a view from the outside of the garden wall looking in |
 |
| The PERFECT 'VL' Villa Leone emblem was another great gift from Jodi along with the 2 opposing lion reliefs on either side of the wall plaque. Another 'lion gift' from Jodi (shown below), was positioned on the return wall along the waterside steps up from the canal. It was originally gold but because it fit so well on the end of the wall, I painted and plastered it to make it appear carved into the stone. |
 |
|
Below is the full frontal view of the stone planter |
 |
|
The carving on the face of the planter is air dry clay casting. The hostas were a very early planting tryout one among many others which followed ... |
 |
 | |
 I made the pot of lavender and the pot of orange nasturtiums with the blue lobelia  EXTERIOR LIGHTING I installed two coach lamps on either corner of the lion wall. Actually, I had forgotten that I had these fixtures until the entire structure was built and the planter was filled. The only way I could properly install and hide the wiring, was to remove all the plants from the planter and run the wires for the lamps down from the inside, then drill a hole through to the underside of the patio, then run the length of wire through a channel carved out of the foam insulation to connect them to the power source attached to the house. It was annoying having to retrofit them after the fact, but in the end, it was worth all the extra time it took.
THE GARDEN AT NIGHT |

 |
| Sadly, this blurred photo is the only aerial view I have of the entire garden with the lights on. |
 |
| The garden lights as seen from the canal |
 |
AND WITH THE LIGHTS ON IN THE KITCHEN |
 |
 |
 |
 |
I'm also on the lookout for a patio umbrella for over the table in the eating area. Meanwhile, I have been busy outside cultivating the plants in my REAL LIFE garden moving them around just like I do in my mini ones! which explains my recent absence from the blogs; just in case you happen to be missing me! So it's Arrivederci to The GARDEN OF VILLA LEONE I hope you enjoyed this delayed garden tour and I Thank You All for coming to visit! I will try and get the conclusion of the top floor of the Villa posted before fall. Maybe by then I will have mastered this new Blogger format:  ciao for now |
 |
|
elizabeth WWG1 WGA |